
How to Wire One 1-Ohm DVC Subwoofer in Series for a 2-Ohm Load
How to Wire One 1-Ohm DVC Subwoofer in Series
Connect two 1-ohm voice coils in series to create a safe, easy-to-understand 2-ohm load at the amplifier.
What this diagram shows
A dual-voice-coil subwoofer contains two separate voice coils, each with its own positive and negative terminal. In this example, both coils have a nominal impedance of 1 ohm. Connecting the negative terminal of the first coil to the positive terminal of the second coil places the coils in series. The two impedances are then added together, creating a final nominal load of 2 ohms for the amplifier.
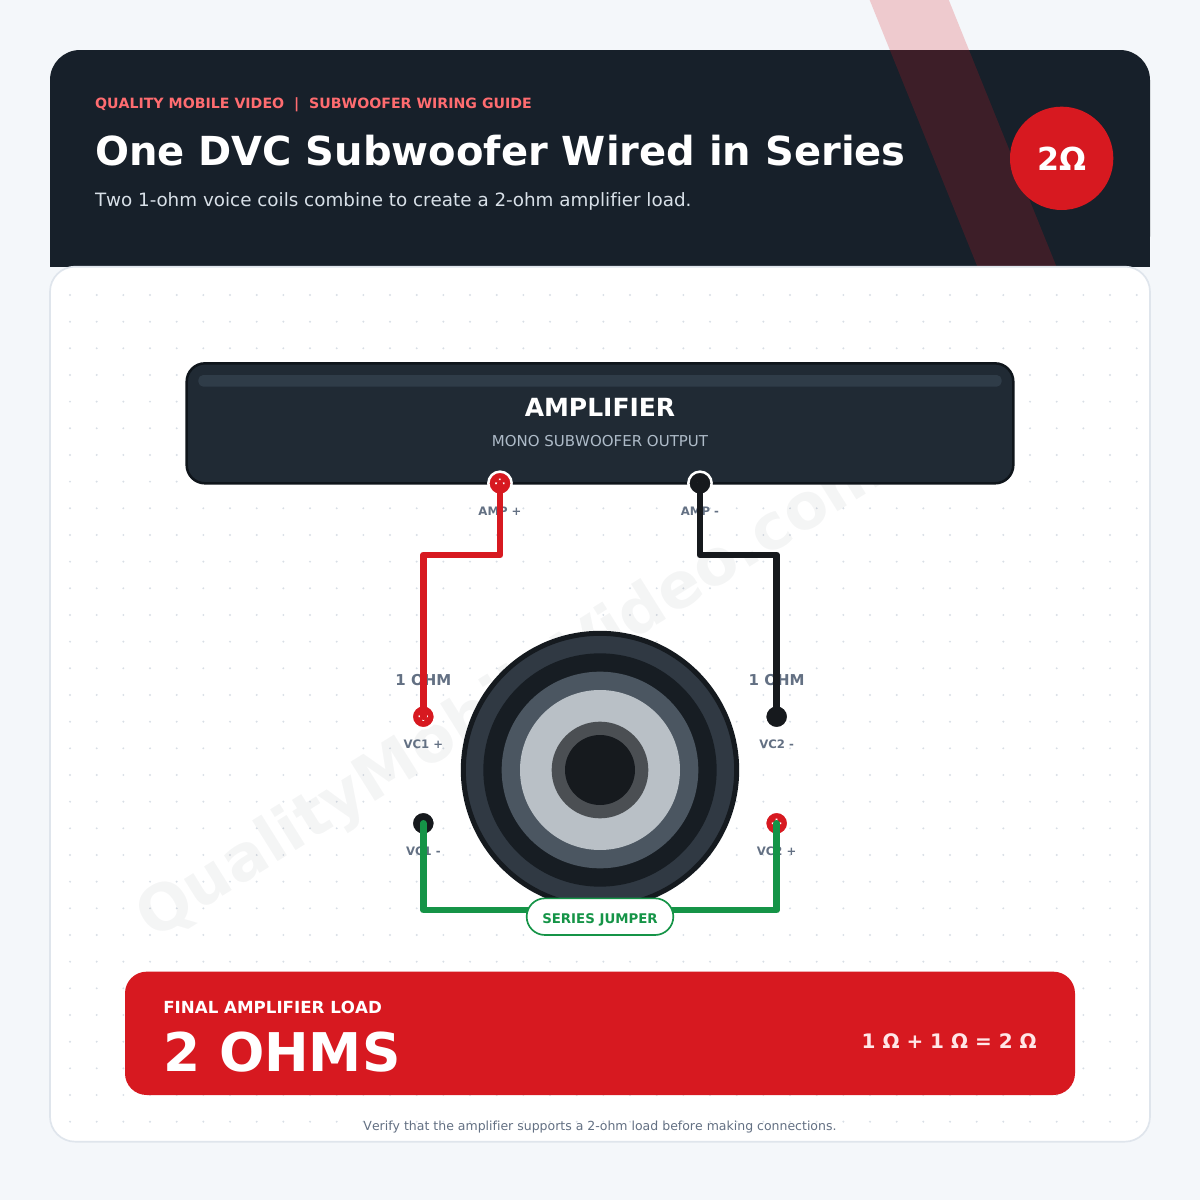
How to wire the voice coils in series
-
01
Turn the system off
Turn off the radio and amplifier, remove the amplifier fuse or disconnect the vehicle battery’s negative terminal, and verify that the amplifier has no power before working on the speaker connections.
-
02
Install the series jumper
Connect the negative terminal of Voice Coil 1 to the positive terminal of Voice Coil 2. Keep this jumper short, secure, and the same wire gauge as the other subwoofer wiring.
-
03
Connect amplifier positive
Connect the amplifier’s positive speaker output to the remaining positive terminal on Voice Coil 1.
-
04
Connect amplifier negative
Connect the amplifier’s negative speaker output to the remaining negative terminal on Voice Coil 2. Gently pull on every connection to confirm it is secure.
Tips for a reliable connection
Use quality stranded copper speaker wire sized for the amplifier power and wire length. For many subwoofer installations, 12- to 16-gauge wire is appropriate; higher-power or longer runs may require larger wire.
Mark the positive and negative conductors and follow the diagram carefully. Reversed polarity can cause weak bass or cancellation when the subwoofer is used with other speakers.
Prevent exposed wire strands from touching another terminal or the metal subwoofer basket. Tighten terminals securely without damaging them.
This diagram is specifically for one DVC subwoofer with two 1-ohm voice coils. Do not use this calculation for a subwoofer with different coil impedances.
Check the completed wiring with a multimeter
Set the multimeter to its lowest resistance range and measure across the two wires that will connect to the amplifier. A nominal 2-ohm subwoofer load will normally show a DC resistance somewhat below 2 ohms. That is expected because nominal impedance and DC resistance are not identical. A reading close to zero may indicate a short, while an open or extremely high reading may indicate a loose or missing connection.
After the wiring is complete
- Reinstall the amplifier fuse or reconnect the battery only after checking every speaker-wire connection.
- Set amplifier gain with a proper test procedure; the gain control is not a volume knob.
- Start with conservative crossover and bass-boost settings to avoid distortion and unnecessary cone movement.
- Listen at low volume first and check for clean bass, loose connections, unusual heat, or protection-mode shutdowns.
- Secure the enclosure so it cannot move during sudden stops or vehicle maneuvers.
Series wiring FAQ
Why does the meter read less than 2 ohms?
The 2-ohm specification is nominal AC impedance. A multimeter measures DC resistance, which is usually lower than the listed nominal impedance.
Can I use this diagram for a 2-ohm DVC subwoofer?
The connection pattern is the same, but the result is different. Two 2-ohm coils wired in series create a 4-ohm final load.
Can I connect only one voice coil?
Both coils should be connected as intended by the subwoofer manufacturer. Operating only one coil can change performance and power handling and may damage the subwoofer.
Does series wiring reduce amplifier power?
A higher impedance generally causes an amplifier to produce less power than it would into a lower supported impedance. Always compare the amplifier’s RMS rating at 2 ohms with the subwoofer’s RMS power rating.
