Car Stereo Wiring Guide
Installation of a car stereo can be a relatively easy thing to do. To make the process easier the aftermarket has come up with a color scheme for all of the wires that you will need to connect to make your new aftermarket car stereo work with your vehicle.
QualityMobileVideo.com carries a vehicle-specific wiring harness and interfaces for virtually every vehicle, we suggest you use it to connect your new stereo to your vehicle’s factory wiring harnesses. This will ensure proper connection to the appropriate signals and works seamlessly, without cutting any of the factory cables just like the factory stereo did.
IN THIS ARTICLE
- Radio to vehicle harness
- Replacement radio harness
- Power wire color meanings
- Speaker wire color meanings
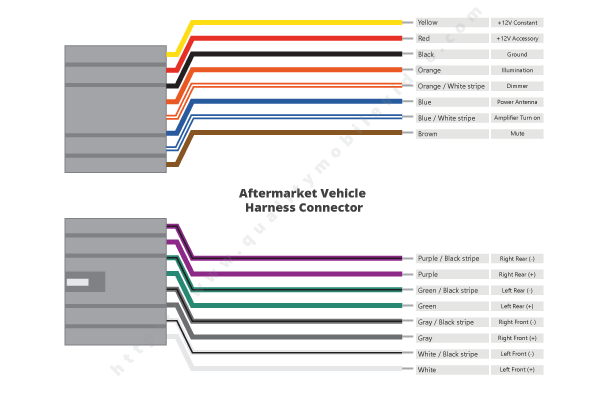
I. Aftermarket Car Stereo to Factory Harness
When removing a factory radio and replacing it with an aftermarket radio, you will need to use a wire harness or interface.
Wiring harnesses allow you to make color coded connections without modifying the factory cabling and connectors . Some vehicles require the use of an interface*; an interface prevents vehicle errors, provides full integration to factory equipment (Amplifiers, Steering wheel controls) when removing the radio due to factory data-bus systems.
*Consult Metra, Axxess Interfaces, Scosche, PAC-Audio, American International vehicle application guide)
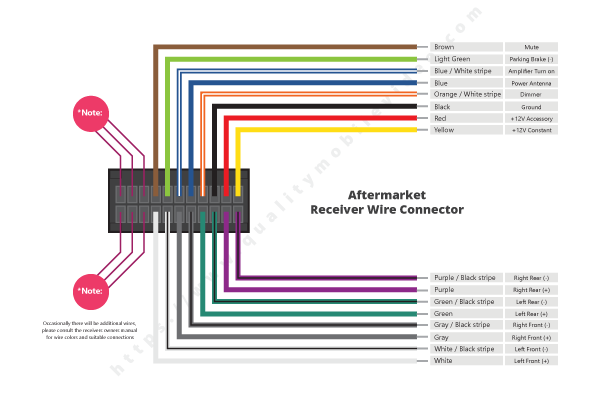
II. Aftermarket Receiver Wire Harness
When installing an aftermarket receiver you will match the functions of the aftermarket wire harness with that of the aftermarket receiver. The wire colors of your new receiver may, or may not, match the wire colors of the aftermarket harness.
The aftermarket harness will include a key that indicates the wire color and function, you will match these with the aftermarket radio harness by function. These connections must be soldered and insulated to prevent accidental shorts. Insulated crimp connectors are also suitable.
III. Power Wire Color Legend
| Color | Polarity | Function | |
| Yellow | + | Constant 12 volt power source regardless of key position. | |
| Red | + | Accessory 12 volt power source requires turning of the key position. | |
| Ground | – | Chassis ground. | |
| Orange | + | Illumination wire, provides 0 volts when lights are off and 12 volts when the vehicle exterior lights are on. | |
| Orange / White stripe | + | Dimmer wire, provides 0 – 12 volts from the vehicle and is adjustable with interior light dimmer control. | |
| Blue | + | Power antenna, provides 12 volts from the receiver when the FM or AM radio is being used. Turns off on any other source. | |
| Blue / White stripe | + | Amplifier turn on, provides 12 volts from the receiver when receiver is turned on. | |
| Brown | + | Audio Mute (Not common and not used in most applications). | |
| Light Green | – | Parking brake, vehicle provides a ground signal when parking brake is pulled up. | |
| Light Violet | + | Reverse trigger (+12 volts when vehicle is placed in reverse) | |
| Pink | + | V.S.S. – Vehicle speed sense (PWM signal / square wave) |


I have my radio harness connected as per color code, but when I turn off the vehicle I loose my clock setting, do I have to connect both the red and yellow wires to retain clock settings?
You have an issue with the yellow wire not staying a constant 12 volts when the vehicle is off. You will need to check this with a voltmeter.
Wire harness, Maestro HRN-RR-F01, has phono plugs for speakers, Pioneer AVH-2550NEX has speaker wires in the power harness AND phono plugs on the back of the head unit. Maestro instructions indicate cutting the phono plugs off and connecting the wires to the head unit power harness wires. Why not just plug into the phono plugs on the the back of the head unit?
Two questions first my harness has orange wire my wiring harness that comes out new stereo don’t I’m confused
Does blue in harness connect to blue/white from stereo
Blue/white wire is for amplifier turn on, this lead will have power on it as long as the radio is on. Blue is power antenna, blue out from the radio only provides power when the radio in in AM/FM mode.
I have a illumination #12 wire and dimmer #24 wire on my 2015 Accord car harness. I only have a illumination #14 on my radio harness and no dimmer. I have no idea what to do with the dimmer.
I also have a vehicle speed sensor on my car harness and no idea where to put it on my radio harness.
Please help,
Pete
Just cap of the dimmer wire, you will not use it.
The wiring harness from vehicle is orange and white and radio harness has a solid orange and an orange and black what do we hook up
You can connect the orange to the orange white wire. Orange white indicates dimmer wire. Dimmer has the ability to adjust the intensity versus just on/off.
I have a 2009 chevy impala that I’ve replaced the stock radio for an aftermarket one with subs added in. Now, in my impatience I decided to not wait for the wiring harness I ordered to come in and just pulled the factory harness apart and used the pin leads to connect to the new radio harness wires. I failed to document what color wire went where on the factory harness and now am stuck with the dilemma of it not completely working. The radio lights up but the screen doesn’t turn completely on. Help please?
You will need a schematic of the vehicle to make a determination of what each wire does. Without that it will be very difficult to figure out what each wire does.
I have a 2009 Chevy Impala that I replace the factory radio for an aftermarket one and in my impatience i instead of waiting for the wiring harness I just went and pulled the pins out of the factory harness and now I can’t recall what the PIN placement was for the new wiring harness I just ordered. Is there anyway you could help me figure out where the which pins go in what spot so I can hook this up correctly?